Jumping into digital history with both feet
15 October 2006
No more fooling with theory and generalities. Its time to get started with your new web project. How better to learn?
Off we go, then.
We’ll start with a very simple, single-page project. We’ll get the development server up and running and use it to demonstrate how the XHTML, PHP, and database components work together, in more concrete terms. This will not, I hope, turn into an extended tutorial, there are plenty of those already out there, but this will give you a starting point for noodling around on your own.
Step 1: Install the XAMPP package on your home PC
Download the basic package – the 33 MB Installer [MD5] version. Ignore the Devel and Upgrade packages, and the Add-Ons. Do the full installation, and say “yes” to all the defaults. This will only take a few minutes. When finished, the following structure, very similar to that which you’ll use on your hosting service’s box, will be in place:
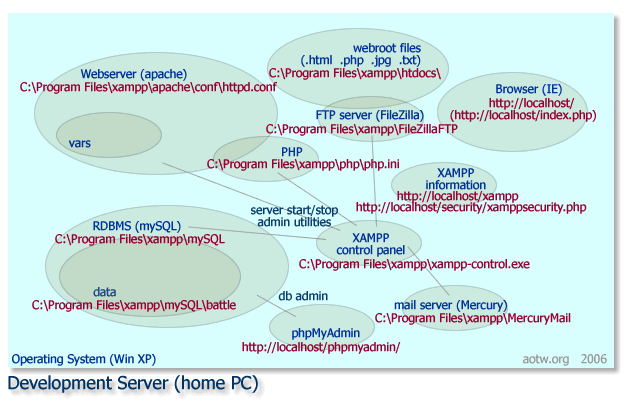
Click on the diagram for a larger version.
I’ve shown the directory paths to the configuration files for apache and php, but you shouldn’t need to do anything to those just now. The default settings will work just fine for our first steps.
Once the installation is complete, you’ll see the orange XAMPP icon on your desktop. Launch that for the control panel to turn the services on or off. Be sure that apache and mySQL are “running” (PHP is there all the time, under apache). We’ll not play with either the FileZilla FTP or Mercury Mail servers at this point, so you can turn them off for now.
Note: the control panel will launch every time you boot your computer and you’ll find it in the “system tray”. When you don’t actually need them, open the control panel and turn these services off – take a load off your poor PC.
Step 2: Create a database
Open a browser and connect to your local phpMyAdmin ( http://localhost/phpmyadmin/ ). This is a graphical tool for manipulating your databases’ structure and contents without having to really know any SQL.
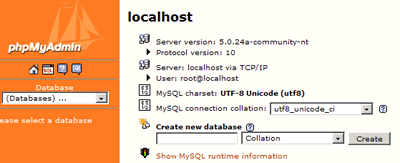
In the middle of the main screen under the words “create new database” is a text box. Type “battle” in it and click the “create” button. You should soon get a screen that says “Database battle has been created.”
There are several other databases already available in the pull-down list on the left side of the screen. These are used for system functions and XAMPP demonstration projects. Be sure you have “battle” selected.
Step 3: Create and populate the first data table
Now we need to put some useful information into the battle database. To do that we’ll create a data table – a place to keep bits of data about a particular subject.
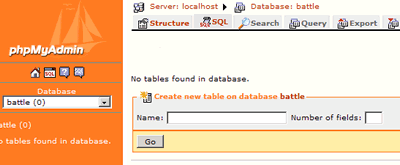
Normally, you would use phpMyAdmin to add a table by typing a new table name in the text box under “Create new table on database battle”, entering the number of fields (columns) you need and hitting the “go” button. Then enter the data characteristics (“datatypes”) for each of those fields. Finally, enter information (“values”) in each field on the “insert” form provided for the table. Normally.
I’ll leave it to you to do that later for other tables. I’ll post about how you might convert and import text information from Word or other sources another time.
To get a jump start for this project, however, I’ve extracted the SQL code to build a typical table and add some sample data from the officers table on AotW. This will quickly do all the steps above. You can play in the data and build your own tables by hand once you’ve seen how we use one here.
Locate the SQL “tab” near the top of the phpMyAdmin screen. Click it. Then, in the large text box under the words “Run SQL query/queries on database battle”, paste the contents of officers_sql.txt and click the “go” button.
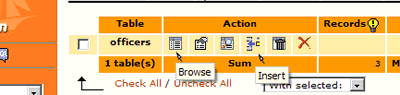
You’ll now have one table with 3 records in it, called officers, in your battle database. We’ll put it to use shortly. In the meantime, poke around in it from the “browse” tab. If you’re feeling daring, use the “insert” tab to create a new row or two.
A data table looks a lot like a spreadsheet, with rows (“records”) and columns (“fields”). A column for first name, last name, birth state, military rank, and so forth, with a row for each individual. Each row has a unique ID number, as well. These will be useful in referring to officers from other data tables (those for reports, units, maps, etc) in the future.
Step 4: Introduce some PHP
Like XHTML, PHP can be written using a simple text editor. Windows’ Notepad will work. I like TextPad, myself.
As you recall from the previous discussion, we’ll be using PHP pages to create the XHTML that’s delivered to the site’s readers. I’ll get you started with a bare bones bit of PHP code.
Again, this is just to give you the flavor. You need to learn the rules and commands of PHP for yourself. This is a small, incomplete, not-ready-for-primetime sample, and ignores things like security and efficiency for the sake of clarity. We’ll expand and improve it over another post or two.
First, you need to know the location of your web root directory. In the standard installation of XAMPP that directory is C:\Program Files\xampp\htdocs\ . The apache webserver knows to look there for your website files. The default “homepage” file it’ll look for is index.html or index.php. index.php is what we’ll be creating in this quick intro project.
There’s already an index.php file in the web root directory–it points to the XAMPP information page–so re-name it to index_old.php. Create a new file (in Notepad, TextPad, etc), paste in the contents of index_php.txt, and save it in the web root directory as index.php.
All the web files you create must be plain text, by the way, and case (capitals and lower case letters) matters. I think its a good idea to stick to lower case for file names so you don’t have to keep track.
Step 5. Try it out
Point your browser to http://localhost/ . The webserver will know to look for the default filename in the web root of “localhost”, which is index.php. You should see this:
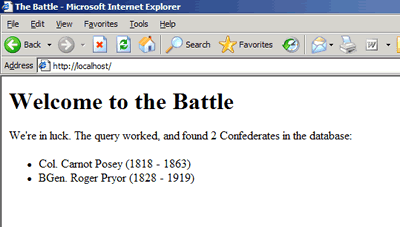
Not terribly exciting, I know, but sufficient for our immediate purpose. We’ll worry about clever layout (with CSS), and dynamic links, and interacting with the readers, and more, another time.
While you’re here, take a look at the HTML code (“view source”) behind the scenes.
Analysis: How does it do that?
Open the index.php file again in your text editor. Let’s walk quickly through it. The code is fairly heavily “commented”. This means there are notes throughout the code to explain what it’s doing. I always comment my code, even if I never expect anyone else to ever see it. Very helpful coming back later, maybe years later, and figuring out what the heck I was thinking …
- Begin the PHP code with the
<?phptag. This tells PHP where to start interpreting code;?>tells it where to stop. - Create a custom function called
showerror()We will use this later to display any errors the RDBMS will send us in the event of a problem. The function’s code is contained within curly braces –{ and }–which makes it easier to see where it ends, and the next set of code begins. - Connect to the database server, and tell it which database we want to use. To do this we pass (send along with the command) the dataserver location–localhost, username–root, and password–empty, using
mysql_connect, and choose the “battle” database usingmysql_select_dbover the established connection ($connection). - Variables–structures used to hold values–always begin with the dollar sign ($).
- We’re using a conditional technique, the if/else structure, to do one thing if a condition is met (like connecting to the database) and another (display an error), if it is not. Try changing a value like password or database name in the PHP code to something invalid, save it, then reload it in your browser. You should get the complaint from the RDBMS
- On another day, we will add password security to the database, and also take standard database connection code out into a separate PHP file, so we can use it all over the site by reference
- Once connected, run a SQL query on the officers table looking for all the Confederates. The query string is assigned to a variable
$sqland passed to the database through themysql_querycommand using the$connection. - The database will return a result set which we put into an array–a kind of grid–called
$result - Use the PHP function
@ mysql_num_rowsto see how many people the query found. - We stop writing PHP briefly to create straight XHTML for the header, as well as
<head>and<body>sections of the document. Then we’re back in PHP again. - If there’s at least one row in the result set, we’ll write (
echo) some text to HTML, and then loop through the results withwhile, grabbing name, rank, and dates to display in a bulleted list on the page. PHP substitutes the actual values from the result set for the variables: like $row[“name_first”] becomes “Carnot” in the first bullet, and “Roger” in the second - If there were no rows found, we would write the “sorry” text. You can test this by changing the SQL
WHEREclause to look for ‘Albanian’ instead of ‘Confederate’. The query will still run, but there aren’t any Albanians in the database. - In either case, we finish the page with the final XHTML elements to make a complete, valid XHTML document.
Any questions? Class …. class …?


November 15th, 2006 at 7:19 pm
[…] Part I;‚àö√ᬨ‚ĆPart II; Part III […]
April 8th, 2007 at 10:08 pm
Hi Brian,
Your tutorial has been invaluable. It serves as a guideline as to how all the pieces fit together and small enough to serve as a starting point to accessing the technology. I am working of a personal project to create a database driven website for my family genealogical research. Also, I am blessed to volunteer my time to create a data driven website for a non-profit organization to archive 55 years of their history. I was hoping to make use of Apache, MySQL, PHP, XML, XHTML and CSS. Thanks to your blog and tutorial, I can see some light along the path I need to travel. Maybe I am too ambitious to try to tackle all these technologies at once yet I think if take it in small manageable chunks it is doable.
I enjoy your website and blog finding both informative and inspirational. I am floored by the fact that you use MySQL, PHP and queries to generate all the pages for your site… AMAZING. Do you use PHP to generate your database tables??? Do you use XML as a staging area for your database tables???
I have so many questions because I am trying to get my mind wrapped around all the technology can do.
Thanks again for all your efforts and the willingness to share your experience and expertise.
Enjoy the Journey,
Tom Williams
April 9th, 2007 at 11:42 am
Hi Tom,
I’m glad if this is of any help, and good luck with your projects. There are lots of other references online with the detail you’ll need as you get further into it.
It’s not so amazing to create a website from PHP and a database, actually. For the first few years I tried to do it all by hand with just HTML. Now that was amazing (and way too hard).
I do have some data entry screens on the website — forms — written in PHP which I and site contributors use to edit existing and create new website data. I also play directly in the database on occasion. Years back, when I was first creating the database tables for things like biographical and unit information, I imported data from spreadsheets I’d been accumulating (formatted as .csv). I’ve also formatted plain text files as SQL “create” scripts to import quantities of data.
I only use XML in 3 places. One is the data source for the Timeline exhibit, second is the RSS feed, and the last are the P3P (machine-readable privacy policy) files. The Timeline and RSS XML are generated from mySQL data, though, with homegrown PHP scripts doing the conversion from data (text) to well-formed XML.
Good hunting!
Brian